Colours are applied by MapLink Pro Studio to elevations and/or depths less than or equal to the level.
For example, with colours defined at 1 and 10 metres, elevations less than or equal to 1 metre will use the colour defined for the 1 metre level. Elevations greater than 1 metre, but less than or equal to 10 metres will use the colour defined for the 10 metre level.
To automatically generate the colour definitions simply click the auto button. A set of levels will be generated based upon the minimum and maximum elevations.
To add a new level, click the new button.
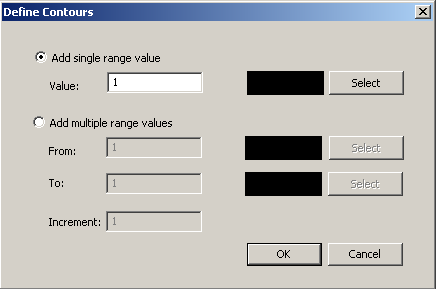
- To add a single level, select 'Add single range value', enter a level in metres, and select the colour to use for elevations up to and including this level. Select the colour to use from the paletter dialog.
- To add a range of levels, select 'Add multiple values', and enter the From and To values in metres and the increment value. Select colours for the From/To values using the palette dialog.
- Click 'OK' to add the new level/range of levels.
To edit an existing level:
- Select the level to be deleted.
- Click Delete to delete the level
To set a range of levels to a range of colours:
- Set the colour of the first and last element that you wish to be in the range.
- Highlight the range of levels and press the Ramp button.
- The intervening colour values will be set to spread between the range limits.
The Save button allows the Contour Levels to be saved to a file. The file format is comma delimited with the level in metres followed by the RGB values for the colour.
The Load button allows a previously saved Contour Levels file to be loaded.
The Automatically ramp colours checkbox, when checked, blends the colours between contour levels.
Copyright © 1998 to by Envitia Group PLC.